
![]()
Hello everybody, my name is Schlangan, nice to meet you !
I won't say many things, I just like coding as a hobby, hence here I am creating a game and working on a software to help with RPG Maker character generation.
If you wish to donate a little bit, feel free to use the Donate button below through PayPal. Thanks in advance !
Table of contents
/!\ These tutorials are designed for the new version of the RPG Maker Extended Generator, from version 0.5. They do not apply to the previous versions.
- Introduction
- First launch - Importation of RPG Maker Default Resources
- Use of the main window : creating a character
- Saving characters and sets
- Random characters
- Database - Categories and parts
- Database - Templates
- Database - Gradient colors
- Database - Mask colors
- Adding/removing/editing resources
- Import/exporting new resources with RXGE2 files
- Importation/Exportation of database - RXGD2 files
Introduction
The extended generator has been created in order to give new options to the users of RPG Maker MV/MZ. While the defaut generator presents many possibilities, we still lack many options. This is why this generator was created. It provides the same possibilities as the generator, while bringing new options for more convenience. However, because of this, the extended generator is more complicated than MV and MZ's default generators. Following these guides will help you understand how everything works.
First launch - Importation of RPG Maker Default Resources
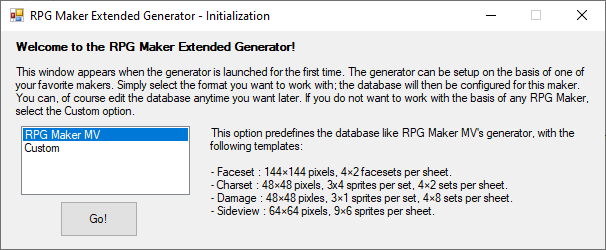
When you launch the generator for the first time, you have to select a mode for the database. Custom will give you an empty generator where you have to configure everything by yourself. The other modes will predefine the database to work with the corresponding RPG Maker.
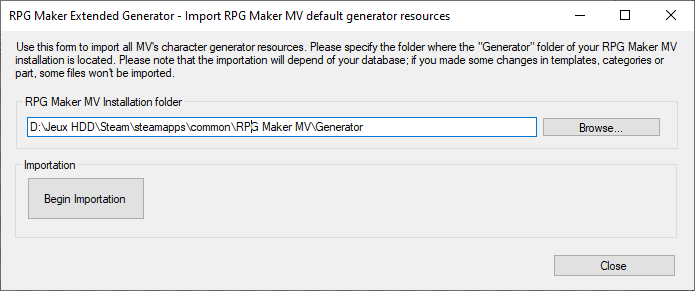
If you select the RPG Maker MV configuration, a new window will appear, to let you import all the resources from RGP Maker MV. You can always reopen this window through the menue Resources -> Import RPG Maker MV resources. Here, you need to enter or select the path leading to the Generator directory within your MV installation folder. If RPG Maker MV has been properly installed on your computer, the path to the Generator folder will be automatically written. Once the generator folder is correctly selected, click on the "Begin importation" button to start the importation. Once the importation is completed, click on "Close" to close thje window. Note that the window will close by itself after a few seconds.
Now, you have all of RPG Maker MV resources imported. If you plan to import all resources from RPG Maker MV later, keep in mind that doing so will overwrite any resource sharing the default names given to MV's resources during importation.
Use of the main window : creating a character
The main window is separated in several parts. Here is the description of every part for a better understanding.

On the left side are filters allowing you to choose elements from Categories (Male, Female, Kid) and Parts (Face, Hair, Clothes, etc.). The last section allows you to only show elements associated to filters you can create in the database. By default, all imported resources have the RPG Maker MV/RPG Maker MZ tag. Unlike RPG Maker MV, the elements are not restricted to categories. On your character, you can have Male/Female elements at the same time.

The top part is used to select elements from your available resources, depending on the filters selected before. To add an element, simply click on the "Add" button or double-click on the element. Unlike MV, you're not limited to an element per part. If you want to replace you currently selected element with another, you can use the "Replace" button or right-click on the new element.

The top right part lists all the elements added to your current character. To replace an element with another, you need to make sure to have the same part selected. To remove an element, click on the "Remove" button or right-click the element. The "See credits" button is used to display the name of the authors of the elements that are currently in use for your character. Doing so, you easily keep track of who you need to credit.
On the right side are four arrows. With this, you can offset the position of the elements on every type of picture. You can for example move the nose around the face, move the mouth, and so on. To do so, click in the main window on the template for which you want to move the element, and click on the arrows. Maintaining the mouse button pressed continuously moves the element.

When you select an element of your character, details about the element appear below. In this part, you select the different colors for the element. You will notice that changing some colors such as the skin color, eye color or hair color affect all elements at once. This will save you some time while deciding the colors of your character.
Opening/Saving characters - Characters (*.rxgc2) and sets (*.rxgs2)
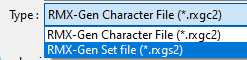
With this generator, characters are saved in two possible formats: RXGC2 for Characters or RXGS2 for Sets. Both are created in the same way, the only difference being their use. The character is what you will use in RPG Maker. Sets, however, are partial characters, for example, a set of clothing for which you selected the colors.
Characters and sets are opened with the same window. However, sets can be added to characters. The set of clothes, for example, can be added to the character through the menu File -> Add character set, or the toolbar shortcut. Doing so, you don't have to redefine those parts for every character you create. To save a set, open the save window, and change the filter as shown below:
In addition, the generator can import RPG Maker MV's JSON character, with the menu File -> Import -> RPG Maker JSON. Since RPG Maker MV saves three characters at once in a file, you need to select which category you wish to import. Please keep in mind that this import will only work as long as you didn't edit MV's resources.
Like RPG Maker MV, you can export your characters to picture files. To do so, either click on the menu File -> Export or right-click on the picture. You can also use the corresponding toolbar button.

The exportation window will open. Most of the default templates of RPG Maker MV are made to have many pictures on single image file. For example, you have 4x2 faces on the same image. When you export, select the template of the image you want to export, and click on a spot to place the image of your character.
If you want to add your character to an existing picture, for example a file where you still have room to add faces, click on the "Load an existing..." button to load the already existing image. If you want to remove the image, click on "Remove loaded image". As long as "Automatic tile location" is checked, the generator will place the picture in a free spot and warn you if you don't have room.
By default, adding a picture in a spot erases what lies behind. Doing so, you can replace a picture. But, if you wish to keep the picture behind intact, uncheck "Rease behind picture". Click on "Export picture..." when you're done.
Random characters
The generator can create a completely random character through the menu Edit -> Randomize character. The randomization will take parts from the selected category. You can change the rules of the randomization by clicking on the menu Edit -> Define Randomization rules

In this window, you define the chance of apparition of every part of the character. The picture displays the default configuration for RPG Maker MV. A random character will have 5% chance to get wings. For each part, you can move around the slider to alter the probability. If you don't want your character to have a part, set it to 0%, while 100% will make sure the part always appears. These rules will be saved once you close the window and persist the next time you launch the generator.
The only rule that doesn't persist after the generator closure is the set. If you load a set, the random generation will make sure that the set is always added. With this, you can generate several random characters with the same outfit, for example. Be careful, if you selected a skin, hair or eyes color in your set, your random character will have those colors forced.
Database - Categories and parts
If you want more Categories than the default categories, you can add new categories to the generator. To do so, go to the menu "Configuration -> Categories and parts..."

With this window, you can easily rename categories, add new ones or even duplicate the existing ones. Then, you select which parts are going to be displayed for each category. For example Beards are not checked for the Female category. Click on the "Done" button when you're done with your changes.
Database - Templates
If the Face, Charset, Damage and SideView templates are not enough, you can add new templates to the generator. To do so, go to the menu "Configuration -> Templates..."
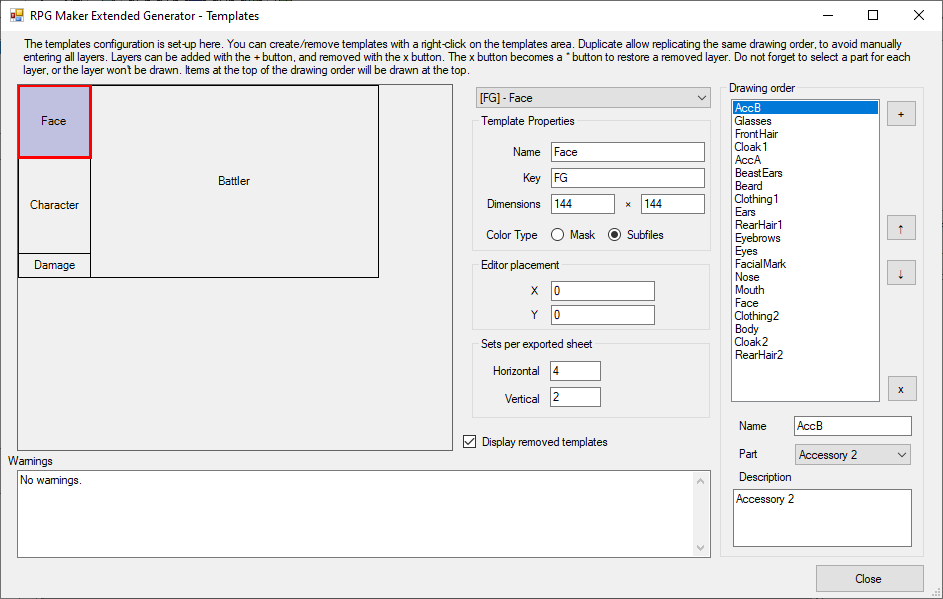
In this window, you define the properties of every template. Keys are unique, you cannot have two templates with the same key, because a resource folder is created with the Key. Each template has dimensions, a position in the editor. The sets per exported sheet correspond to the number of picture of characters saved on a single file. For example, you have 4×2 faces on single png file.
The last option is the Color Type.
- Mask files : Select this option when any picture you add to the template is associated with a mask file, like charsets or side-view actors.
- Mask color ID : Use this option if you have several pictures per element, with a single color par picture. This is for example used in the case of face elements.
Every template has got its own configuration for the drawing of layers. You can create as many layers as you want and set them in order. The layer at the top of list will be the layer apearing at the top of your character. Each layer must be associated to a character part, defined in the Category and parts window.
You can create or remove template by right clicking on the templates. To facilitate the creation of the drawing order, you can also duplicate templates. Depending on what you change, warnings will tell you if your modifications will lead to the deletion of some of your resources.
Database - Gradient colors
RPG Maker MV uses a gradient file to color the resources. That file is imported with MV's resources, but you can also add your own colors/gradients. To do so, go to the menu "Configuration -> Gradient colors..."

Gradients are associated to a category. Categories are the color tabs which appear on the main window. The Other category cannot be edited nor removed. If all categories are removed, every color ends up in that category. You can reorder the category as you wish.
If you want to import new gradients through a gradient file, click on the "Import gradient file..." button. The gradient file must be 256 pixels wide and its height a multiple of 4. You cannot edit imported gradient file directly. However, you can preview the effect of the gradient on the iprcture on the right. To load another picture file for preview, click on the picture.
If you create a new gradient with "New gradient..." button, you select the color, and the gradient properties appear. Each slider correspond to a color. To add a slider, double-click on the gradient preview. Right-click removes the gradient. If you double click on the slider, you can change the color. For now, you cannot move the sliders by drag and drop. Instead, click on a slider, ans enter the new location between 0 and 255, then click on set. Two sliders cannot be in the same position.
Database - Mask colors
Coloring elements in the generator is based on the use of mask colors. They are used to tell the software which type of colors the elements are composed of. To manage these different colors, go to the menu "Configuration -> Mask colors..."

If you've imported all of RPG Maker default resources, you should have many mask colors registered. Each mask color has a name given, in order to easily identify it. If you look at RPG Maker MV's mask files, you'll see that the skin is represented by a single color, the hair by another, and so on. These are mask colors. You can add new masks colors by pressing the "New mask" button.
By selecting a mask color, you can change the associated color by clicking on the "..." button and choosing the new color. The "Apply everywhere" checkbox is used for colors that have an impact on the whole character. For example, side-view, charset and damage bodies have a body color and the eye color. However, the eyes for faceset come from a different element, Eyes, instead of body. If the "Apply everywhere" is checked for Eyes color, changing the color on the body will change at the same time the color of the eyes on the body and also the eyes element. It also applies for Skin and Hair by default. Doing so, you won't have to set manually the color for every different element of your character.
Each mask color is associated to one or more color categories. When you must select the color of an element, the generator reads those categories and open the corresponding color tab. Also, random characters pick colors that belong to the mask categories.
Adding/removing/editing resources
You can always manually add new resources to the generator. Note that the process is more complicated, be sure to read everything here. First, click on the menu Resources -> Manually edit resources...

This window is split into two main windows. On the left, you define the resources properties, while on the right you define the resources files.
The list on the left can be filtered with the dropdown lists above it. For each resource you enter a name, select the categories, the associated part, the tags, the authors, and the icon by the clicking on the icon picture. The icon must be of a 64x64 size. To add tags or authors, type them in the textboxes, each tag/author being separated by a line break. When you create a new resource with the "New" button, only the resources you created since you opened the window are displayed. The new resource will take the base properties of the resource you've been selecting until now.
Each resource contains one or several files per template. When you create a new file, you need to select its template and layer. The list of layers depend on the part of the resource and the selected template. The files have three possible types.
- Sub File: For templates like faces, the file contains one part of the final picture. Each subfile is associated with a mask color. The file at the top will appear on top on the final picture.
- Regular File: For other templates, this is the normally colored file.
- Mask File: For other templates, this is the file that allows coloring of the regular file. "Mask file" is checked for them.
While a template can have as many subfiles as required, there can only be one regular file and one mask file per template. To select a picture for the file, click on the "Click here to import picture". You'll have to select a picture whose dimensions match with the template. The dimensions are recalled in the dialog title when you select a picture.
Instead of clicking on import, you can drag and drop the picture file to the "click here to import picture" area. Same thing for the icon. You can also drag at once all the PNG files of your resource on the list of files. In that case, the generator will calculate each picture size and define the template and mask files. Then, you have to select the layer and mask colors by yourself. Keep in mind that the automatic calculation of the template only works if template have different sizes.
Import/exporting new resources with RXGE2 files
Resource creators who use this generator may propose you RXGE2 files to import into this generator. The importation/exportation of those files is reached with the menu Resources -> Import/Export RXGE2 files.
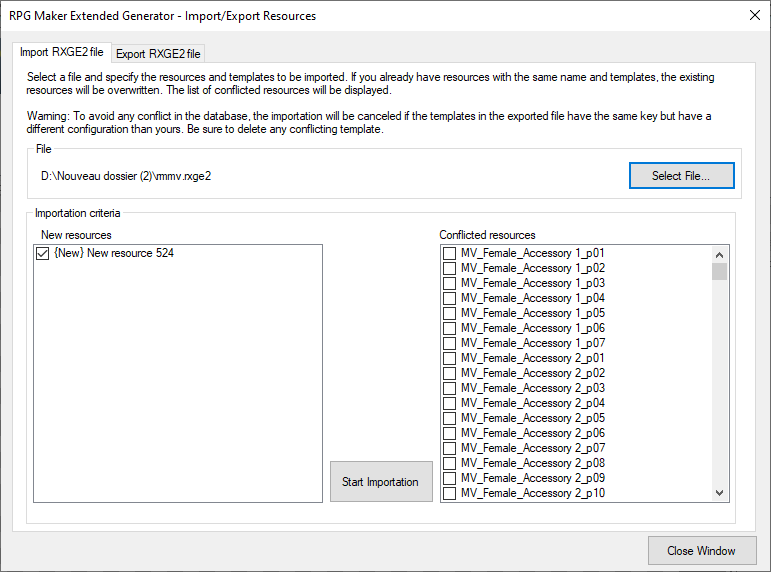
The first tab allows you to import new resources. First click on the "Select file..." button. Go fetch a RXGE2 file. If the file is correct, the resources found in the file will be displayed. Two list will appear, the new resources that you do not possess, and the conflicted resources. Conflicted resources are resource that you already possess for the templates contained inside the RXGE2 file. You check the resources yous wish to import.
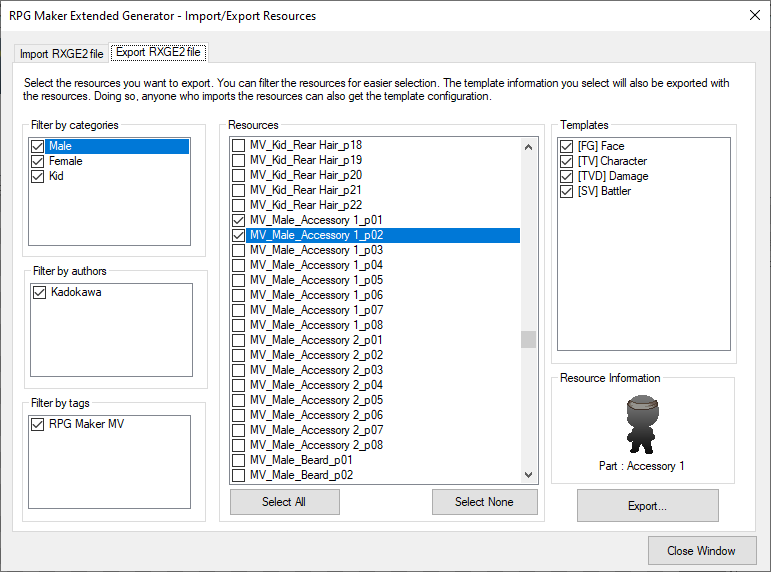
The second tab lets you export the resources to a RXGE2 file format. You can filter the list of resources with the the three lists on the left side. On the right side, you select the templates you want to export with the file. Click on export to create the RXGE2 file, which you can redistribute directly.
Importation/Exportation of database - RXGD2 files
In addition to resources, you can also export the whole database configuration, with the menu "Configuration -> Import/export database configuration". The database will be exported to a single file. However, if you import a configuration, all your resources will be removed first, to avoid compatibility issues.